Welcome to The Makeup Piggy blog! This is where I write about anything makeup-related in my life, whether it is stuff I bought, inspirations I found or step-by-step tutorials I created. I also have reviews of circle lenses and makeup products. If you like what you read here, please drop me a message or follow my blog!

If you have questions regarding my tutorials, check out my FormSpring page to see if I have answered it already. For specific questions and business enquiries, contact me at
makeup.piggy AT gmail.com

Tuesday, June 19, 2012

Circle Lens Review - LuxuryBabe 02 pink

Today I am reviewing the LuxuryBabe 02 pink lenses, sponsored by apple of your eyes. These are 3-colored lenses with a very simple yet striking design, and the color is very unique as well.

A while ago I reviewed the Beaucon Jewel pink lenses, which have a similar design as this pair but with only two colors instead of three. The inner "burst" of orange for these pink lenses give them more character and prevents them from looking like dead fish's eyes. 


Natural light
Indoor light
Flash

Enlargement-wise, these are moderate in power, but the strong contrast between the solid black ring and the light pink main color is stunning from all distances. 

Natural light
Indoor light
Flash

I have quite a few pairs of pink lenses but they all have different shades of pink. For example, the Big DM23 pink lenses is much darker compared to the LuxuryBabe 02, They are also larger in diameter.

Natural light
Indoor light
Flash
The Super Glamour Pink lenses are comparable in size to the LuxuryBabe 02, but the pink is much warmer in the LuxuryBabe.

Natural light
Indoor light
Flash

Here are all the lenses worn in this review. Clockwise from the top: LuxuryBabe 02 pink right side up, Big DM23 pink, LuxuryBabe 02 pink upside down, Super Glamour pink.


FINAL VERDICT:
Design: 9/10 - Some people might find them a bit too freaky to wear, but I think they look awesome
Enlargement: 8/10 - You can never go wrong with a solid black outer ring
Comfort: 8/10 - They slide a wee bit when worn, but it's probably my eyes being weird
TOTAL: 8.5/10 - These are very cool lenses, and the color is unique as well!

Thank you apple of your eyes for the lenses!

♦♦♦

Saturday, June 9, 2012

Circle Lenses Review - EOS New Adult Green


Today I am going to review the EOS New Adult Green circle lenses, sponsored by MukuCHU. If you have been following the circle lenses trend you probably have heard of the Adult lenses before; I have reviewed the old Adult Green lenses here, and the new Adult lenses are very different in design from the old ones.

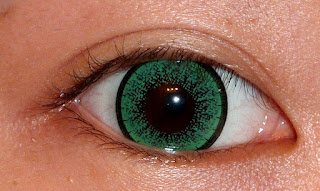
The feature I like the most about the New Adult lenses is the intensity of the color. I have a collection of green lenses but I think these are among the most intense. For some reason green lenses tend to be darker; maybe it is to make them more wearable and less freaky? :p

These two-color lenses have a thin, solid outer black ring with tiny black spikes going into the middle, and an gradient of the main color that fades into the pupil. 

Natural Light
Indoor light
Flash

The New Adult lenses have decent enlarging effect. At certain angles I notice the "halo" where the lenses move.

 Natural light
 Indoor light
Flash

The Dreamy.i Green used to be my go-to lens for creepy green eyes, as the color is strong and the enlargement is good. The New Adult have a wider color ring and the color is stronger as well, but the Dreamy.i is more yellow-toned.

Natural light
Indoor light
Flash

Compared to the Misty Green, which has three colors in the design, the New Adult has a simplier design but more vibrant color again. 

Natural light
Indoor light
Flash

Here are all the lenses used in the review. Clockwise from the top: New Adult green right side up, Dreamy.i Green, New Adult green upside down, Misty Green.


FINAL VERDICT:
Design: 9/10 - Strong color but would be nice if there is more different tones
Enlargement: 8/10 - Decent enlargement
Comfort: 9/10 - Same comfort level as my other EOS lenses
TOTAL: 8.5/10 - Love the vibrant color, would be great for cosplay

Thank you MukuCHU for the lenses!

♦♦♦

Sunday, June 3, 2012

Korean-style Makeup inspired tutorial + BB Cream review


I recently acquired a few samples of Lioele Triple the Solution BB Cream, and it inspired me to do a Korean-style makeup tutorial. I don't have a "Korean" face so it probably looks a bit weird on me, but my goal is to demonstrate a few key trends in the makeup style. 

Here is a closeup of my eyes, showing the thick, straight brows, long eye shape (instead of round shape popular in Japanese-style makeup) and highlighting of the undereye "poofs"  (called aegyo sal in Korean) 
         

Here is my bare face so I can demonstrate how the BB cream looks on my face. Notice that I also have no undereye poofs as well.


The Lioele BB cream goes on quite smoothly and does not feel oily, but it settles down on my face a bit quick so I have a wee bit of trouble spreading it. The coverage is quite good and it cover my minor blemishes well. The color is slightly lighter than my skin tone but I think that works for Korean style makeup. I did not powder my face as I want to retain the dewy look and also see how well the BB cream stays on my face.


I applied a mid-tone brown eyeshadow from my lashline up to slightly above my crease, as well as to the outer third of my lower lashline.


I then added dark brown shadow along my lashline up to halfway up the crease, and to the outer corner of my eyes to lengthen the shape.


Using a black-brown eyeliner pencil, I lined the upper lashline, extending the line out slightly at the outer corner. I also lined my lower waterline to add depth.


A beige shimmery shadow is added along the bottom of my eyes to create a fake "poof" under my eyes.


I then lightly shaded underneath the highlighted "poof" with the mid-tone eyeshadow to make the illusion  even more convincing.


For my brows I use a brown-black powder, keeping the shape of the brows straight and thick. I also keep the peaks of the brows slightly lower than I usually draw them to give a more innocent look. I also put on two layers of mascara after curling my lashes.


Finally, I added blush to the apples of my cheek, a bit of shimmery highlight power to the top of my cheekbones, and finish with a warm nude lipcolor.


At the end of the makeup process, which took about 45 minutes, the BB cream still looks quite fresh on my face. Normal foundation usually start to be a bit shiny because I have oily skin. I think the color also settled a bit and looks more like my natural skin tone. Overall this Lioele BB cream is the best one I have tried so far; most of the other ones I tried are too light, too pink and/or too grey on my face. I might get a full size tube someday. :)

Here are two more pics from different angle. Thanks for reading!

♦♦♦